This practice was a lot of fun, and I paid close attention to every element of this work! It was a joy to explore every aspect of the piece displayed because I have always enjoyed art and the ability to create it myself. I found it to be exquisite, fascinating, and articulate, especially the way the water mirrored the buildings or the way the water’s colors of black produced a rippling effect. I was so engrossed in admiring each brushstroke of the artists that the 10-minute timer passed me by. The entire thing was laid back.
I’m a person who sticks to things no matter what, especially if I’m passionate and/or concentrated on them. Despite having become accustomed to the short attention span, instant gratification world of social media and technology, I was completely captivated by the picture. I found it simple to take it easy and simply sit in silent reserve, with only me and the meticulously arranged colors in front of me. This workout was much more than necessary as it provided a respite from a nation that is constantly urging you to go faster every day and from having to use your computer and smartphone for everything you do in this day and age.
“Nocturne in Blue and Silver” by James McNeil Whistler
For me personally, I could see myself using these exercises as a means to temporarily detox from social media, the internet, and technology in general. I could incorporate them into my daily routine, choosing different paintings and time limits with every session. Not only does it help clear my mind from all the stress that this complicated, busy everyday life brings, but I also get to appreciate more gorgeous art pieces that are equally thought provoking. I believe many other young people in my generation could greatly benefit from doing something like this! It doesn’t have to be the exact same exercise, as long as the concept and message are the same. It’s an effective way to build ones patience and attention span over time, allowing someone to be more effective at their job dealing with angry customers, or navigating family drama for example.
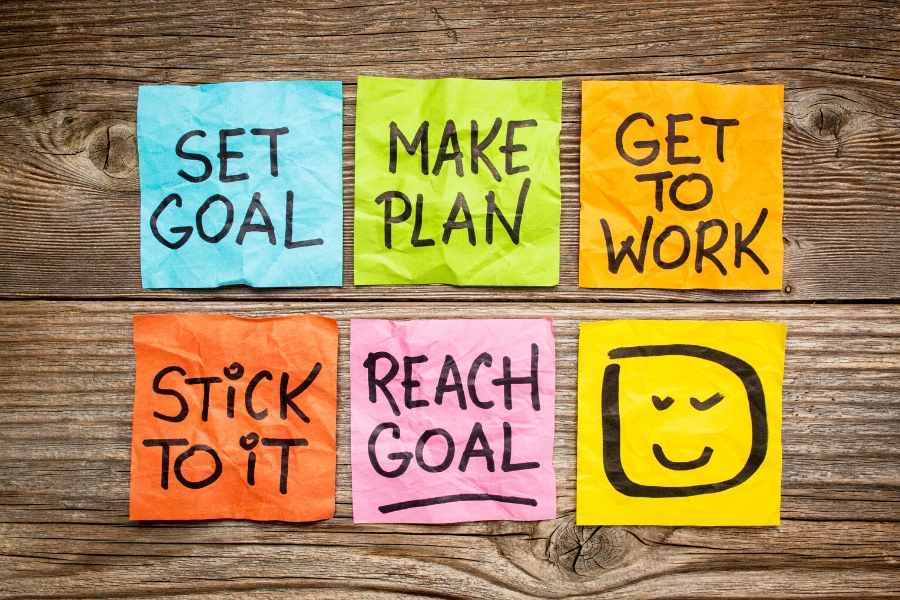
I’ve never been one to be organized or methodical with my dreams and goals, but this week’s assignments helped me practice the skills necessary to get serious about it. The time, creativity, and energy management worksheets that I was tasked with completing really opened my eyes to what I could improve on work wise, what I was actually pretty capable of, and what I really wanted out of life. It started with stating in writing what my three biggest priorities in life were. I decided upon financial stability, a happy, healthy marriage, and being handy. I then divided my time spent on various activities and chores throughout the 168 total hours in a single week. I found that I ended up using more that the total number, almost 200 hours. I began seeing how my priorities were in the wrong places, as most of my attention was on entertainment and hobbies. Regardless if I overestimated how much time I was actually using, it was a problem that needed addressing.
The next exercise was more of a questionnaire, designed to reveal what I may already be doing correctly, and what I could be doing to improve my time management. I was in deep thought when asked about if I had been setting short and/or long term goals, if I knew what I wanted out of life and how to get it, etc. I was honest in all my responses, stating that I was definitely conscious of my moment to moment choices and what they mean. I also stated things like that I admittedly could research more on how to improve my productivity. It was a productive introspection on myself and daily habits and mindset.
I then took part in “The Whim reaper” exercise, where you think hard about all the things you would do with your life in a year, with you dying at the end of it. No matter how outrageous the dream or how far fetched the goal, you’re supposed to write it down and really own it, believe in it. I always found space and planets fascinating, so one of my answers was to train being an astronaut and fly to the moon! Another one of my manifestation answers was about how I would exercise daily and work up to running a marathon, since I had always had an interest in being able to run fast. From what I understand about this Whim Reaper business is that it’s about pushing yourself to make the most of your time, doing something with the life you’ve been given, a big push for you to live actively. I found it quite helpful in my personal experience.
The last big activity that really jogged my mind to start taking my goals and dreams more seriously was the “Hole/Goal” exercise. It’s meant to visualize your goals and roadblocks in the form of ladders, putting your ultimate life goal at the bottom of the “Hole” ladder and at the top of the “Goal” one. You list the obstacles that you’re facing to achieve your goal first, then you take those obstacles and turn them into solutions. In my case, getting married and having kids was my ultimate goal, but I needed to complete my masters program first, buckle down and focus on my priorities more, and needed to have a part time job for now to stay afloat. I then took a more positive approach to my roadblocks by doing the opposite on the second ladder, starting with how I can overcome my challenges. I only have to spend one year in my masters program, then I can immediately start job hunting and save 70 percent of my income. I’ll then build good credit to be able to apply for a down payment on a house and a car, eventually building up to the house and cars my wife and I want, as well as providing transportation for our future kids when they’re older.
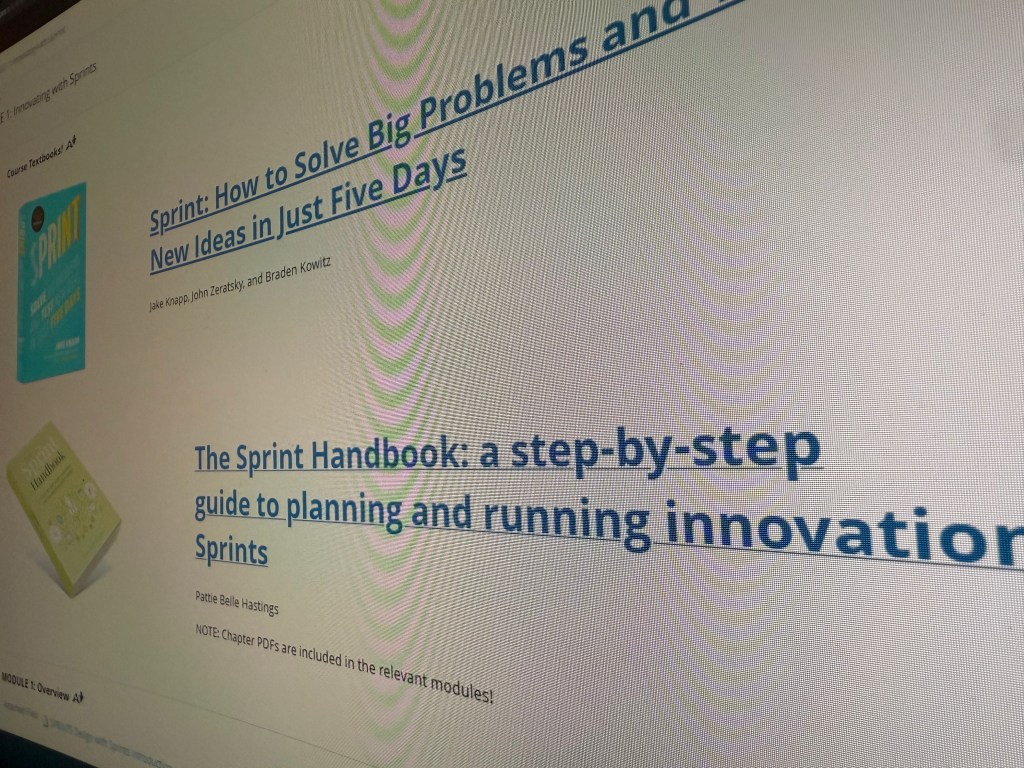
Having spent an extensive amount of time learning the ins and outs of the design sprint process, I can safely say that this next course will be more my speed! From what I understand, it’s much more simple in its execution and teachings, containing lots of writing, citing, and plagiarism checking that equals a straightforward approach to how work is completed compared to design sprints. Usually, the graduate-level introductory course, Foundations of Graduate Studies, is intended to assist incoming master’s and doctoral students in making the move into graduate school and succeeding in an advanced academic setting. To give pupils the tools, abilities, and attitude they need to succeed in their postgraduate studies, it typically covers academic research, writing at a scholarly level, critical thinking, ethical and moral research, and using institutional resources.
Graduate level writing and communication is one of the areas that Foundations of Graduate Studies focuses on. Students are taught how to properly format their research papers such as a bibliography, in formats such as APA and MLA. Websites like EasyBib help check for plagiarism, cite sources correctly, and correct any grammar and/or spelling mistakes.
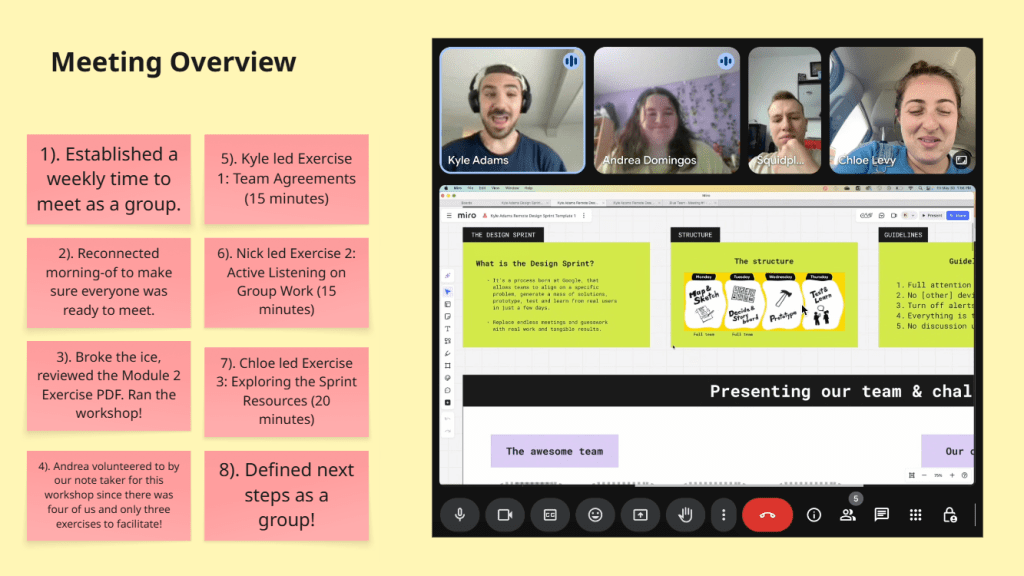
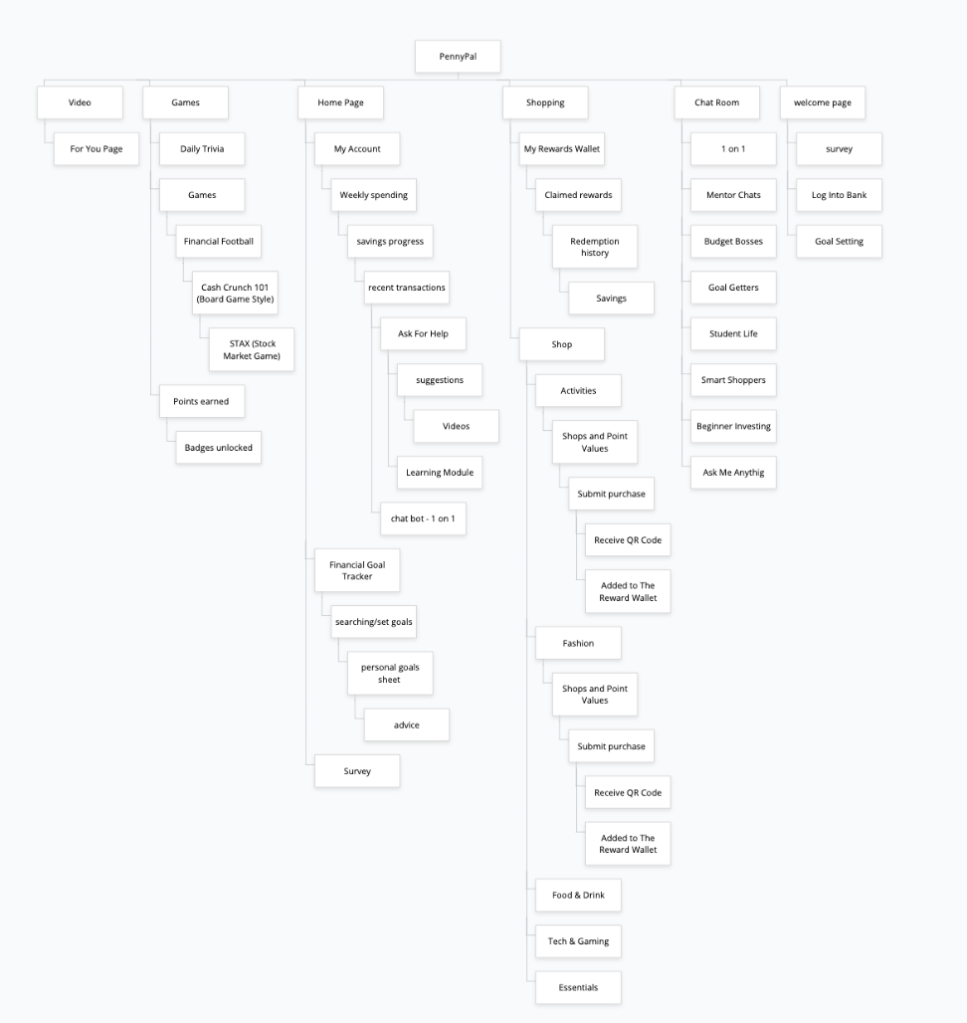
This Saturday concludes the end of my first official sprint, and I’m exiting the experience all the more enlightened and eager for the future! I obviously couldn’t have done it without my talented classmates by my side, so allow me to introduce them and break down our procedures! My team consisted of Chloe, Kyle, Andrea, Dylan, and myself (Nick). We would split up the responsibilities of our sprint process every week to shake things up and give everyone a fair, equal amount of work. The whole process took 7 weeks, beginning at the end of May and concluding at the start of July. We would meet once per week (outside of our weekly class meeting) on Fridays from 1PM to 2:30PM. We set out to create a finance app for young adults to help them manage, build, and more effectively save their finances and give them the tools to learn about finance in general. And thus, PennyPal was born!
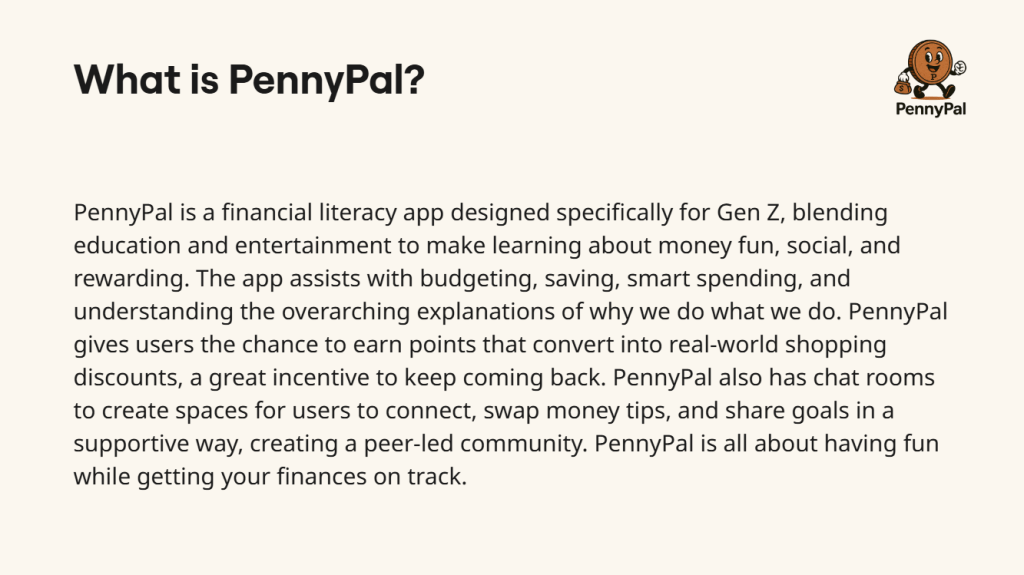
PennyPal combines education and amusement to make learning about money enjoyable, social, and rewarding, making it a financial literacy program created especially for Gen Z. The software helps with budgeting, saving, making wise purchases, and comprehending the overall reasons behind our actions. A significant incentive for users to return is PennyPal’s ability to allow them to accumulate points that can be redeemed for actual discounts in the real world. In addition to its chat rooms, PennyPal fosters a peer-led community by providing locations where users can interact, exchange financial advice, and share objectives in a supportive manner. PennyPal is all about managing your finances while having fun. A person categorized in Generation Z (Ages 13-28) should use the educational smartphone app PennyPal to teach his/herself the ins-and-outs of financial literacy, as well as formulate a long-term budgeting, saving, and/or investing plan.
Sprint Overview
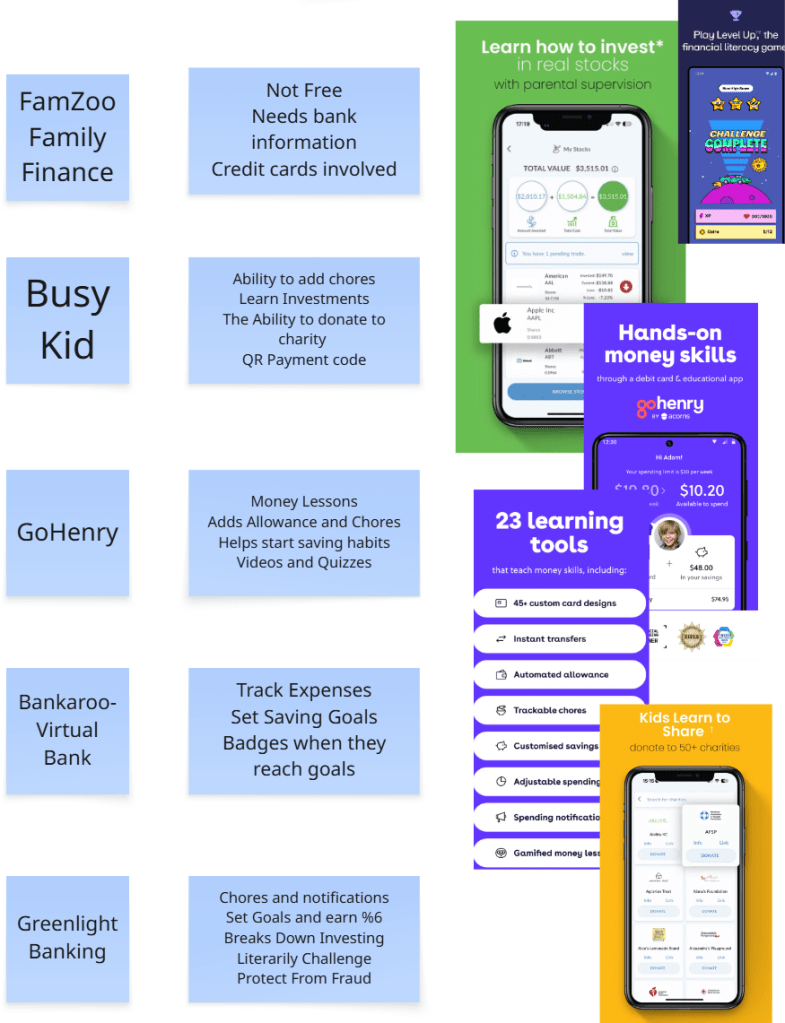
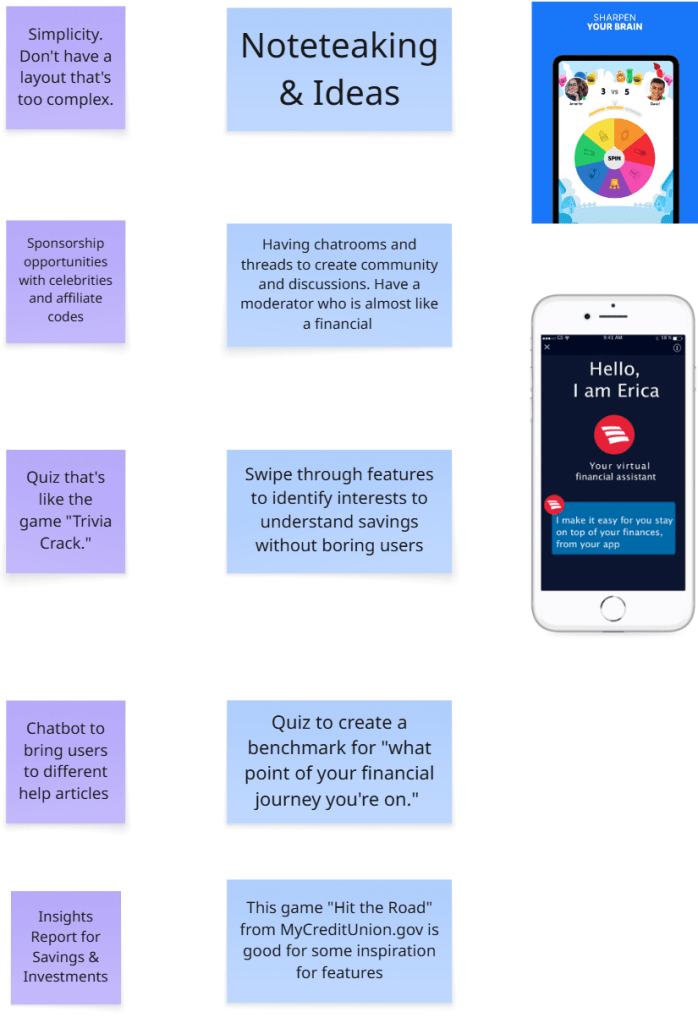
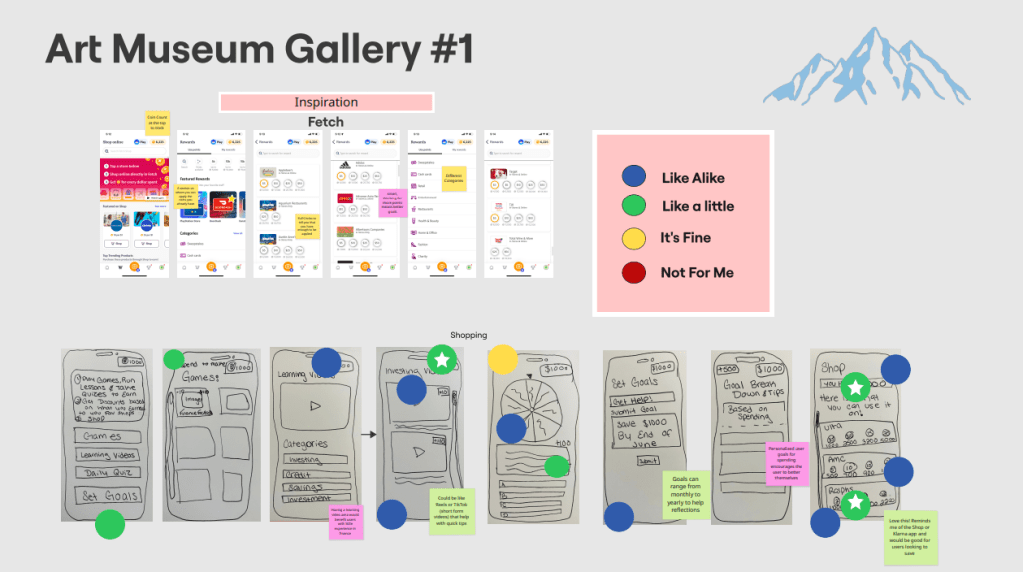
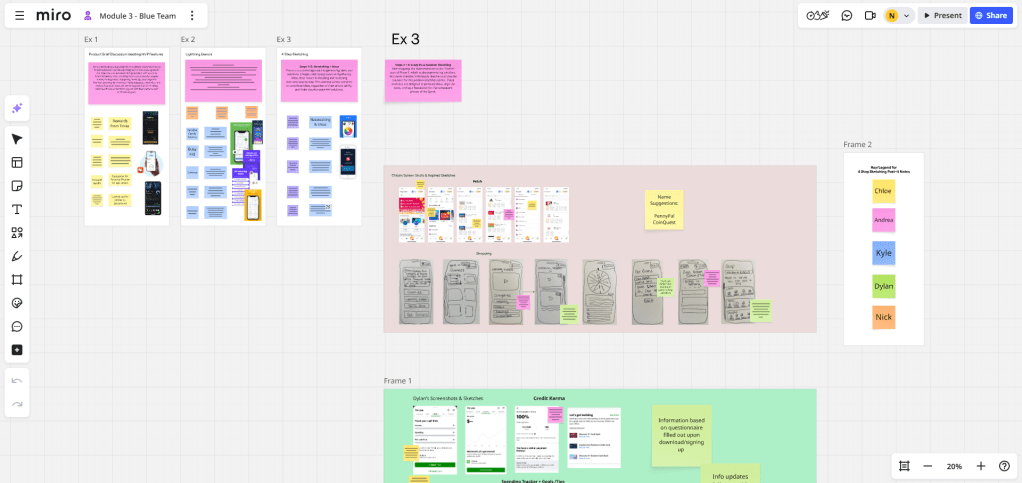
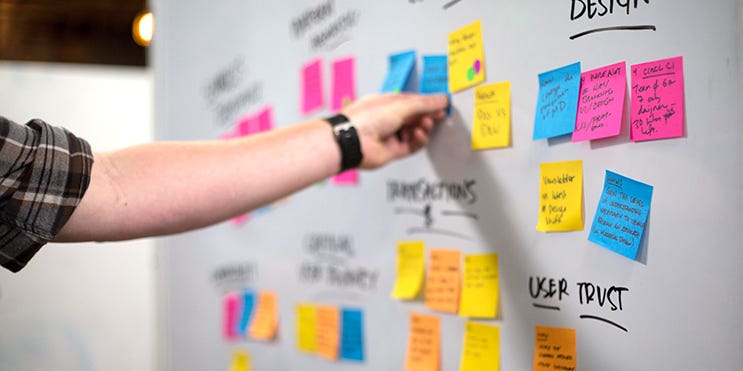
Phase 1: Team Blue began the sprint process to build a successful finance app prototype by researching other mobile apps to draw inspiration from. I personally chose to follow the example set by Discord, as I felt it’s chat rooms could be useful for connecting with other users and allows for 1-on-1 communication with a bot for finance advice. My other team members came up with things like bar graphs for measuring goal progress, a shop for users to redeem real-life rewards, and video feeds for learning new topics. Some finance apps that we looked to were Credit Karma and Fetch. We placed all of our sketches into a shared Miro board and left sticky notes on them to share what we liked about each one.
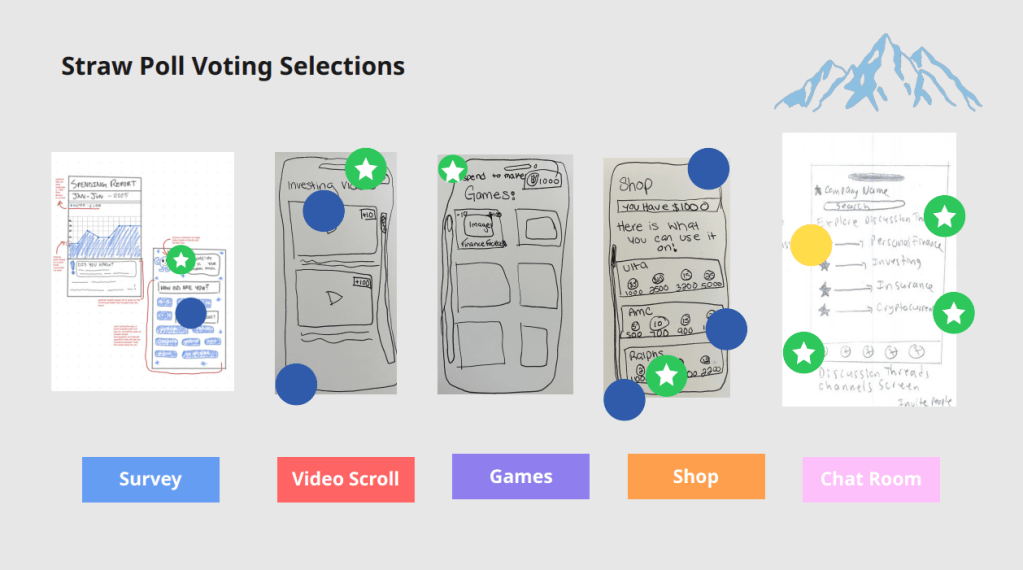
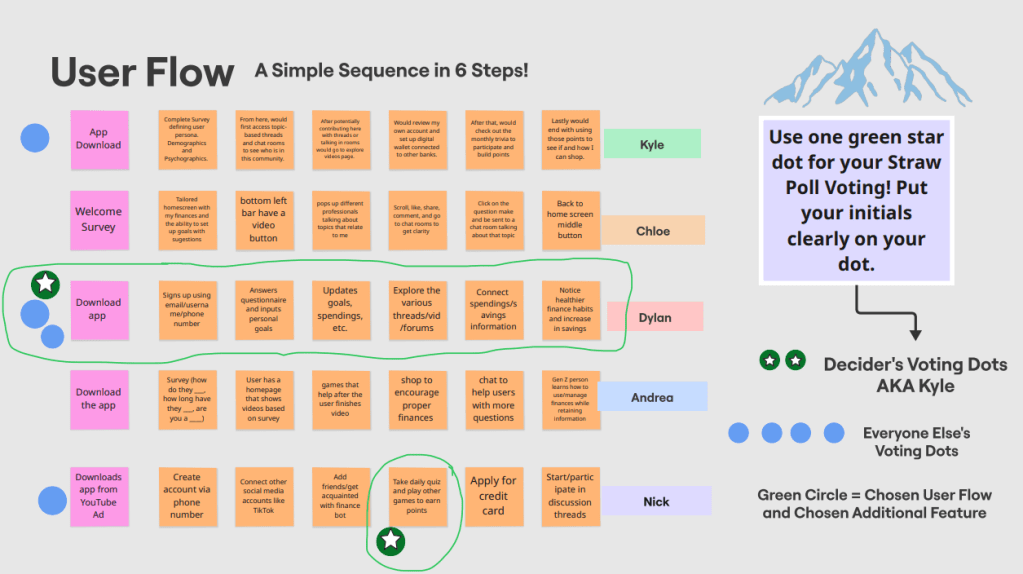
Phase 2: Once the second phase kicked off, we commenced the voting practices that are commonplace in the design sprint process. We used Heat Mapping to anonymously decide which were the best sketches and which were the worst ones. Blue dots signify sketches and ideas that we really like for the finance app, and red dots represent the opposite. We narrowed down the options even further afterwards by participating in Straw Pole voting, placing a green/white star dot on the sketches that are guaranteed a spot in the prototype. After gaining a better focus on what features our app will eventually have, we crafted our own user flows and voted on what the best one is out of them all as well. It’s essentially a line of six post-it notes that outline the most logical path that a user would take when using the app. For example, it would start with the user signing up using their email and/or phone number, that leads into taking the intro survey to better gauge the users financial interests and goals.
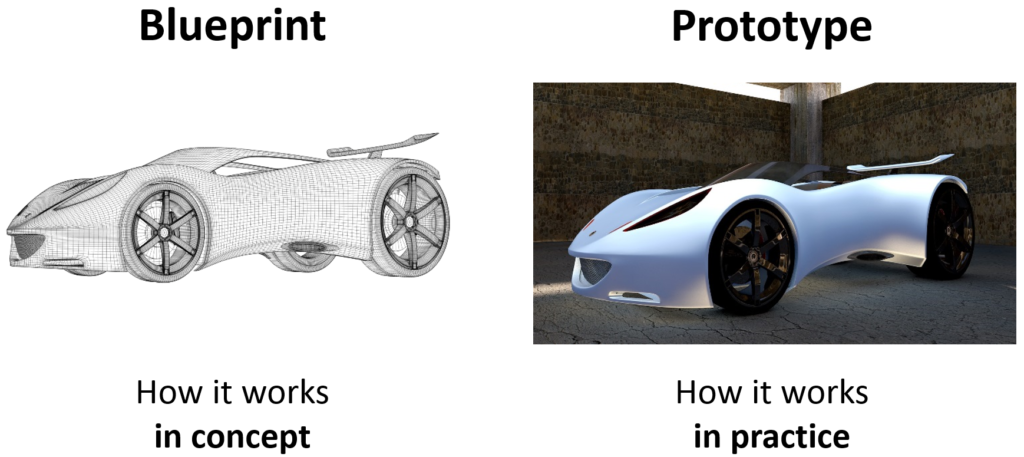
Phase 3: Phase 3 involves developing a realistic prototype of the chosen solution. While concentrating on the essential interactions and components of the user interface, the prototype might have a low or high fidelity. We took into account the nature of the product (digital, physical, or service) when selecting the right tools. The objective is to develop a product that is sufficiently realistic for user testing. My job in particular was to play the role of team support, as anyone who is not prototyping still contributes. My responsibilities included analyzing the prototype for clarity, errors, or gaps in the flow, creating fictitious data or accounts to mimic actual usage, and assisting with the creation of assets (icons, pictures, etc.).
Phase 4 and 5: The goal of Phase 4 and 5 is to assess whether the solutions that were tried in the Sprint are valid or not. This is where essential qualitative and quantitative data is gathered from potential users of the product or service being created in the Sprint. We had to recruit 3-5 people to interview for user studies, schedule and conduct said user studies, and collect and organize the data to see the best way to develop the product. These user tests are interviews that ranged from 5-10 minutes per participant, in which they were all asked the same set of questions. We could not interview someone that we knew, it had to be fresh faces with whom we have never seen before.
The problem statement of our design sprint was to create an educational, finance mobile app that caters to Gen Z. Coming from Gen Z myself, I know how addictive smartphones and other technology can be! So in order to not only lean into the informative side of the app as well as the fun, interactive side evenly, we emphasized the use of the games section and the video feeds/chat rooms sections to maximize the chance of Gen Z using PennyPal consistently. The kids and young adults will get plenty of learning in through the use of tutorial videos, 1-on-1 bot chat rooms, and connecting with friends while also being rewarded by playing the various games and points they can earn. They can use those points for real-life gift cards and other monetary items in however way they see fit.
Sprint Activities
Lightning Demos: All team members share their notes and apps that they used for influence. Team members can place their notes on post-its and take screenshots of the apps that caught their eye.
4-Step-Sketch: Ideas and solutions are produced. Team members jot down ideas, then proceed to draw and sketch solutions step by step. It promotes the sharing of ideas from individuals of all skill levels and aids in picturing possible answers.
Heat Mapping: Team members place color coded dots on everyone’s features to determine what they like and dislike for the prototype.
User Flow: Everyone creates a line of six post-it notes that depict how a user would go about navigating through the prototype. Team members vote on the most logical one.
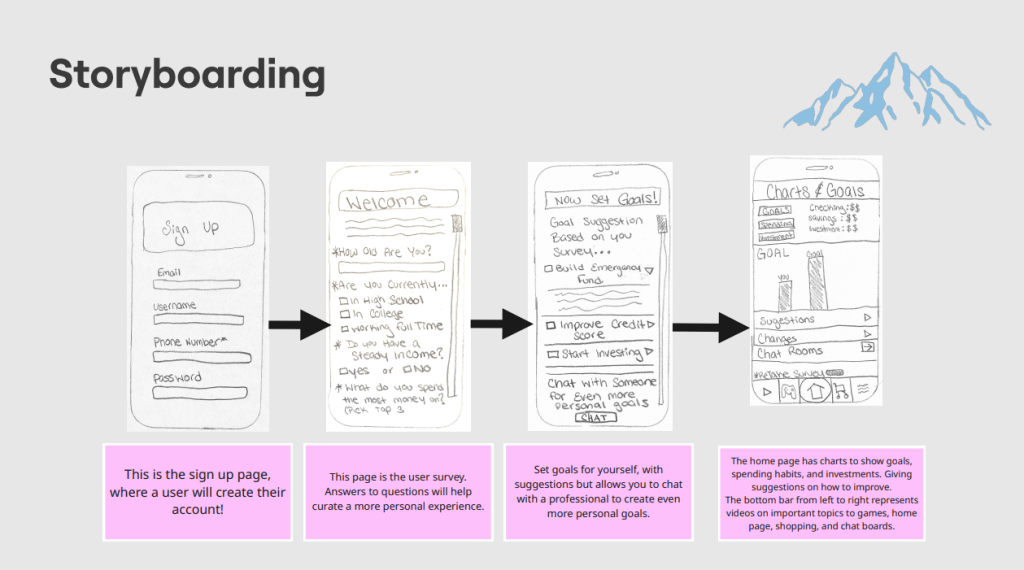
Storyboarding: Combines both the chosen user flow and the most popular sketches from the previous exercise to show how the prototype will end up looking like.
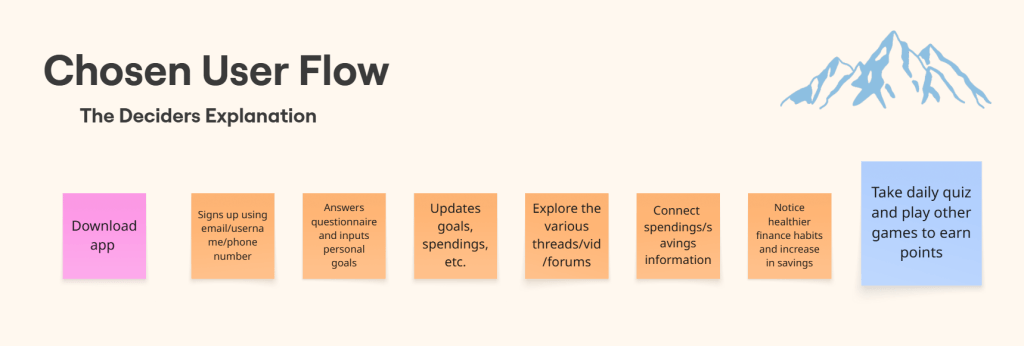
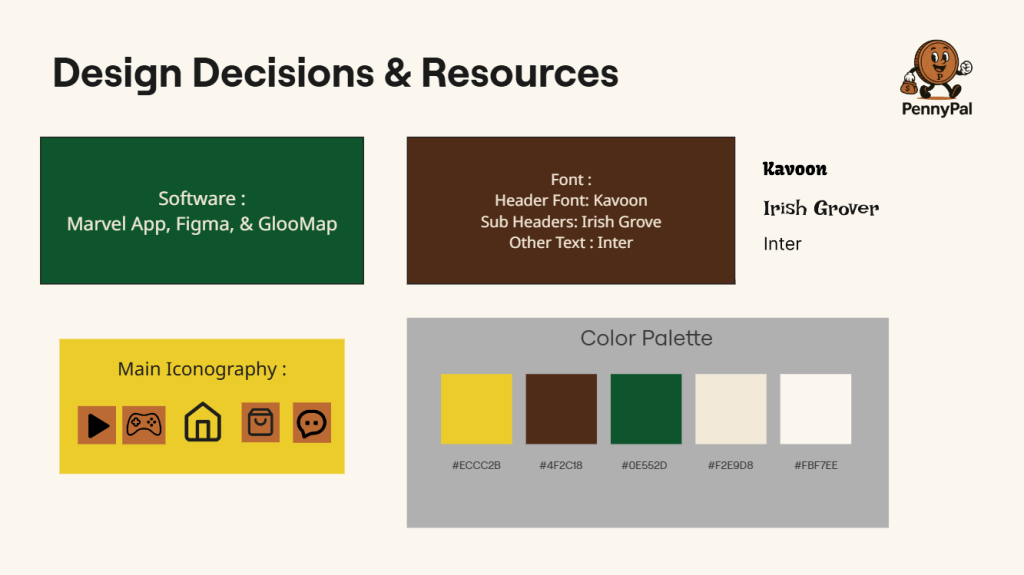
Prototyping: The Blue Team crafted the first prototype of PennyPal using a handful of software. We selected the font, iconography, and color palette carefully to make sure our app makes a strong first impression on our user test participants.
Testing: Blue Team members Chloe and Andrea facilitated the user testing interviews, asking the same questions to each person as they explored PennyPal.
Conclusion
All in all, my first design sprint was a complete success. The Blue Teams communication was on point for the entire course and we all worked hard to formulate the best prototype that we possibly could. We found from our user tests that PennyPal will an exponential growth rate if it sticks to the Daily Trivia and Goal Tracker features. We also found that its chat rooms need more of an entertainment sheen to them as well as upgrading the color palette and incorporating the PennyPal mascot more. After all the incredible work the Team Blue accomplished with this prototype and design sprint, I have no doubt that PennyPal will be a staple in the finance and mobile app worlds respectively for many years to come! Countless young adults from Gen Z and many more fresh faces from the generations after us will arm themselves with financial knowledge and confidence in order to not only survive in this unforgiving world where money makes everything go around, but thrive in it as well!
A quick summary of the shiny, new finance app: PennyPal!
In the context of a Design Sprint, which Google Ventures made famous, the user testing portion of the Sprint process is a crucial step that takes place on the final day (Day 5) of the Sprint. The purpose of this phase is to confirm (or disprove) the remedies sought in the Sprint. In the Sprint, this is where crucial data (qualitative and quantitative) is gathered from the individuals who would be using the product or service that is being created. It also allows the Sprint team to minimize risk before investing in development, address usability challenges early, and obtain immediate feedback on hypotheses made throughout the sprint. For my team specifically, our finance app, PennyPal, was ready to be put to the test by real people, where they’d be able to tell us the advantages and disadvantages of our prototype. This is how we went through the operation and what we found!
User Testing
First, we followed the guidelines for Sprint Phase 4 to recruit 5 candidates for our user interviews. Secondly, we had to plan and carry out our user studies in accordance with the guidelines for facilitating and recording the process. And third, we had to examine the data gathered throughout the research, then, compile and arrange the discoveries and findings into practical actions for the products development. But I’m getting ahead of myself here! What exactly is user testing? The goal of user testing is to determine how simple and efficient a product is by watching actual users utilize it. It’s extremely important for the last phase of the Sprint process because the test shows what issues cannot be overlooked in the product’s overall success, and users will use it in unanticipated ways. Also, by making the program more intuitive, efficient, and enjoyable, testing can help retain users.
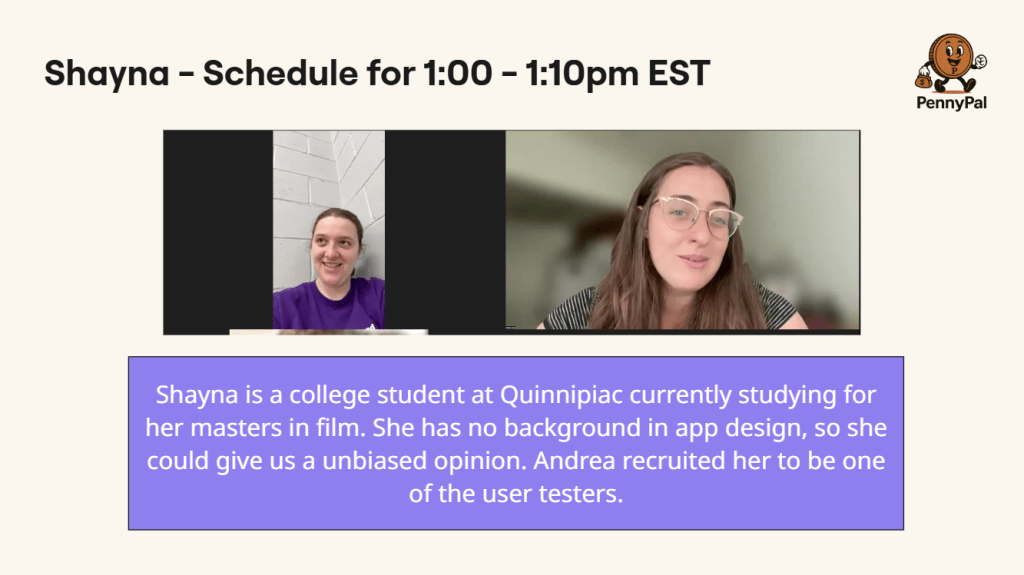
A user interview with Shayna, one of our candidates for testing.
We had to recruit 3-5 people to interview for user studies, schedule and conduct said user studies, and collect and organize the data to see the best way to develop the product. These user tests are interviews that ranged from 5-10 minutes per participant, in which they were all asked the same set of questions. We could not interview someone that we knew, it had to be fresh faces with whom we have never seen before. For example, If Kyle is a friend of mine, I cannot facilitate him for this exercise. Our user tests revealed that PennyPal’s growth rate will be exponential if it concentrates on the Daily Trivia and Goal Tracker features. In addition, we discovered that its chat rooms need more of an entertainment sheen, improvements to the color scheme, and greater inclusion of the PennyPal mascot.
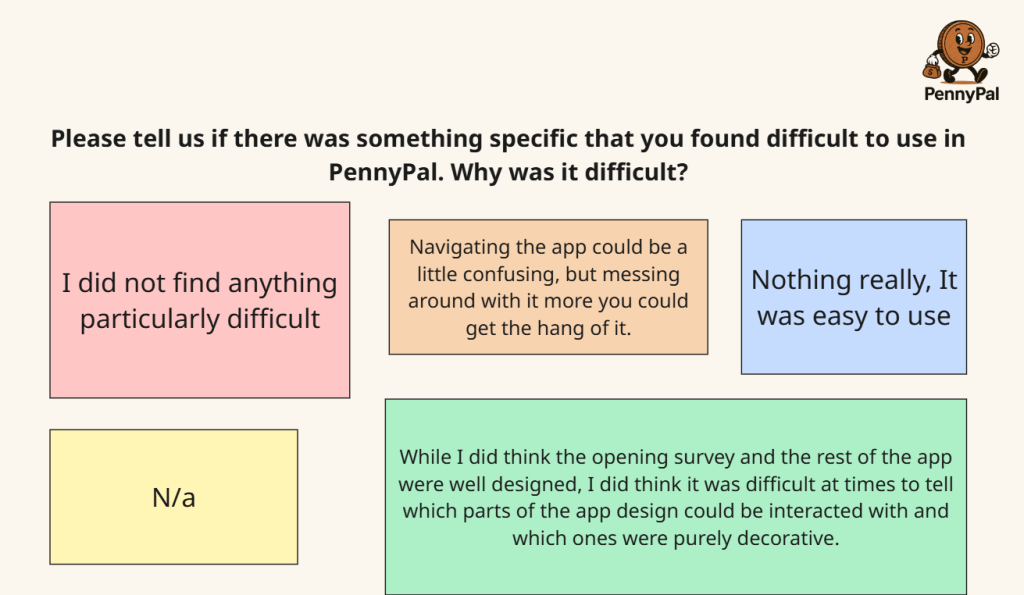
One of the five feedback sheets from one of our volunteers.
As you can see, user testing and feedback is critical to the success of a design sprint teams prototype. Having a few outsider pairs of eyes can help you spot issues and dilemmas that you didn’t think were there or could be there. I think the idea to use the PennyPal mascot more in particular would be a genius idea! It’s a kid-friendly marketers dream, with the penny’s big smile, cartoon hands and feet, along with its signature money bag that will be easily recognizable to Gen Z. But that’s not to say the other points the user testers made weren’t equally valid, because they were! Incorporating a slice or two of entertainment into the chat rooms will make it so that the tech-obsessed Gen Z doesn’t get bored and/or too overwhelmed with all the tutorial videos and stale 1-on-1 bot conversations. Leaning into the Goal Tracker and Daily Trivia features more with serve to keep Gen Z motivated to keep using the app, with the thrill of reaching a new milestone and turning the trivia questions into redeemable points can prove to be very lucrative.
PennyPal is the name of our brand new finance app!
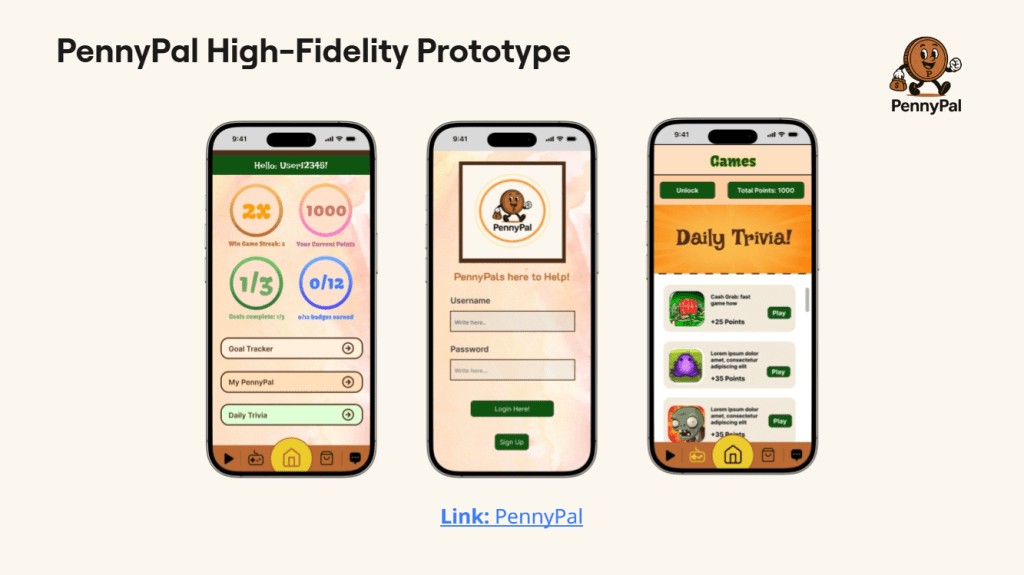
This week, my team and I developed a realistic, interactive prototype of the program in the prototyping phase of the design sprint, concentrating on important user flows such as saving, budgeting, and earning rewards, which are all based on the storyboard. The prototype of a financial app for Gen Z should be realistic, using vibrant images, a fun tone, and interactive features like quizzes or challenges that mirror the behaviors and preferences of Gen Z. The objective is for us to produce a straightforward, testable version (typically 4–6 screens) that can be utilized for user testing the following day. It’s easily the most difficult part of the sprint process, but it’s also the most rewarding to make up for it!
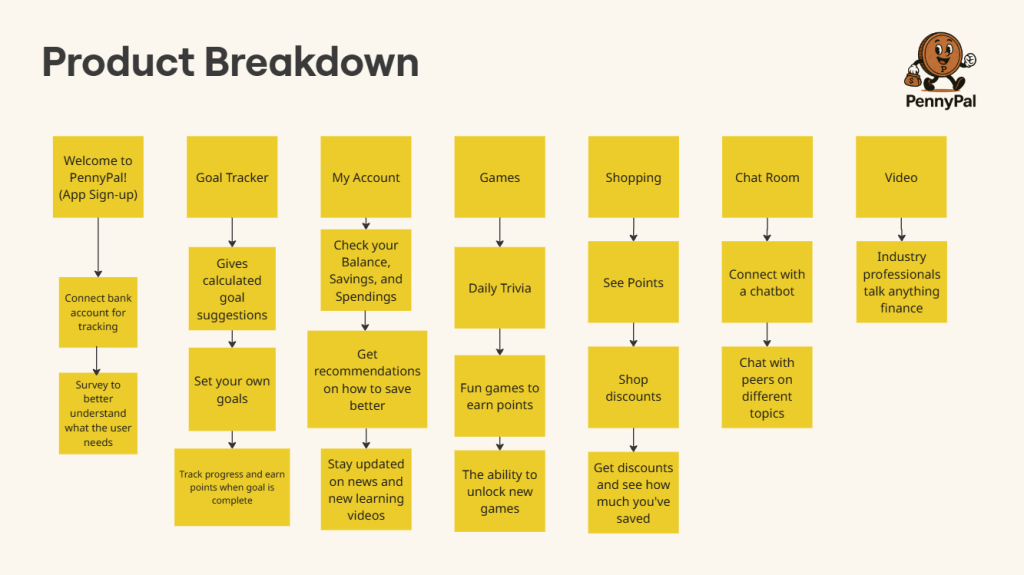
The Product Breakdown
We started with the product breakdown, where we took all of the different avenues that PennyPal offers to its users and create a mini timeline for each one to explain how they’d each be used. These avenues could be anything from the signup process, to the games and shopping, or the users account settings. For each avenue, we included a thorough explanation of the purpose they serve in the app and how they’ll benefit the target audience, which is Gen Z. For example, the video feature explanation is as follows: 15-60 second video format is perfect for short attention spans. Gen Z grew up with high-speed internet and instant gratification. This will satisfy that while providing education at the same time.
The many functions of our finance app and how users will interact with them.
App Mapping, Wireframing, and Low/High Fidelity Prototyping
The next step in our prototyping process was to create an app map and the wireframing to go along with it! An app map is a visual representation of its architecture, showing the links between its elements, such as functions, classes, files, and services. It is frequently used to comprehend and evaluate the application’s architecture and behavior. The wireframe portion of this next step is when we take our previous sketches from each avenue of our prototype and showing what screen comes first, second, and last. One of them, for example, would go from the home page, the users account, and their goal tracker tab. A low fidelity and high fidelity prototype can then be created, with the former in particular being a rough, early version of a sprint teams product that is mainly used for testing ideas and gaining user feedback before the latter, the high fidelity prototype, is birthed. Our team is full of talented people who created the design for the high fidelity prototype to bring PennyPal to life!
The complicated app map of PennyPal and its high fidelity prototype!
User Testing
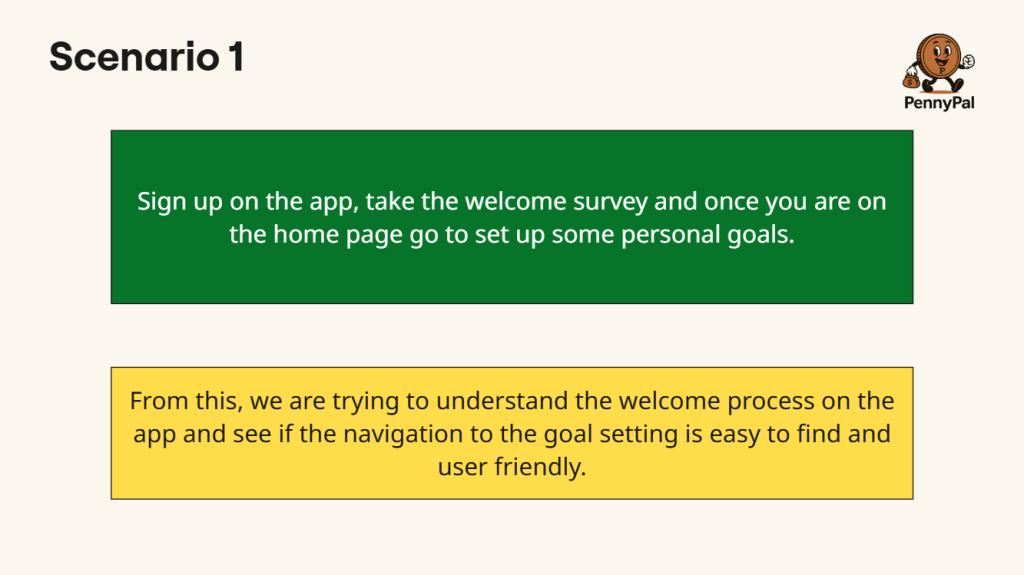
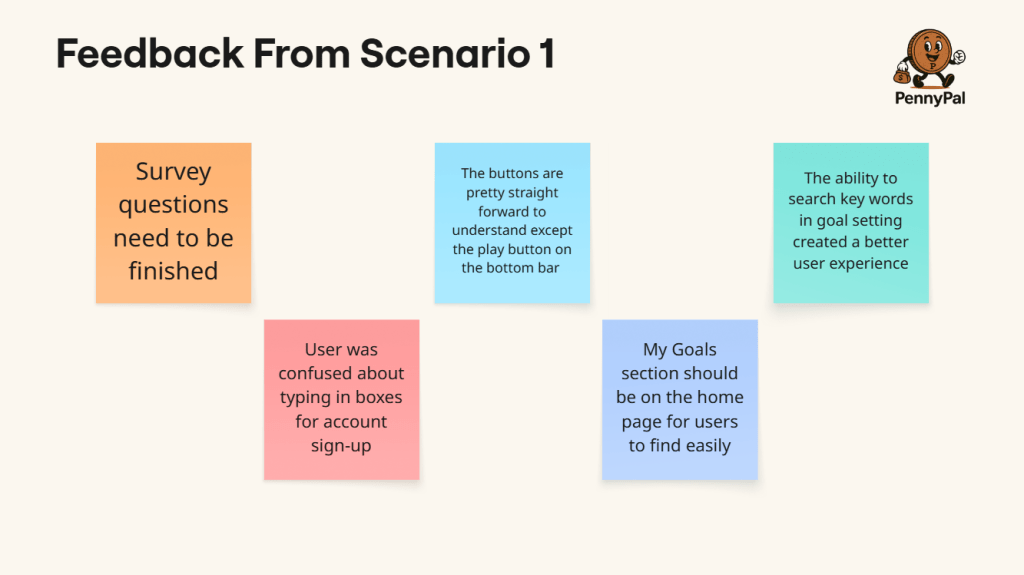
Prior to testing with real users, the User Testing Simulation is a trial run of your usability test. It helps find and resolve any problems with your prototype, test script, or configuration, making sure that the actual test runs without a hitch and provides valuable input. The sprint team creates a scenario, they identify the goal of the scenario, and proceed to gain user feedback to see what they can improve on. The scenario shown below is about when a new user opens the app for the first time and is beginning the sign-up process! The feedback works out any kinks and smooths out any bumps in the road to make the experience more user friendly, as the goal aims to do.
One scenario from the User Testing portion and the feedback associated with it.
Now that all of the prototypes have been made, Day 3 is officially over! We’re now in Day 4’s User Testing phase, which – by judging from how hands-on Day 3 was – Day 4 will be even more busy and involved! This is a crucial stage of the Design Sprint with lots of goals to accomplish. To crush our targets and have Day 4 be a resounding success, we will have to partake in tasks like testing our hypothesis, collecting usable data, developing a risk mitigation plan. Happy sprinting!
The first part of phase 2 of the sprint process was interactive as it was intricate. Once my team made our sketches of our finance app from the previous week, it was time to transition into the next phase of the sprint. We proceeded to partake in various voting methods to determine the exact features that our app will contain, as well as the user flow exercise to decide on the best chain of events that users of our app will take. Finally, we created a storyboard, a step-by-step visual of the ideal path of how users with interact with the prototype. It was the most involved that I’ve felt during my first sprint journey so far! Let’s break it down!
Heat Map and Straw Pole Voting
Heat Map voting was the first method we used to pinpoint what the undisputed best features for our finance app could be. It’s when all team members examine each members set of sketches, quietly place dots onto them. The dots themselves are different colors that indicate if that team member liked or disliked the sketch or not. For example, a blue dot means we liked the sketch and idea a lot, and a red dot means the sketch and feature wasn’t for us personally. We took about 5 to 6 minutes carefully examining each members sketches and being honest, yet anonymous, about what we want and don’t want on our app. I thought that Chloe’s shop, where you can spend your hard earned points on rewards like gift cards, was a very cool idea that I liked a lot! I immediately gave it a blue dot!
Next the Blue Team kicked off the Straw Pole voting process! This narrows down the app features even further by picking the most popular picks from the Heat Map vote and placing one green/white star dot on our favorite sketches and ideas. Our findings and results came out to be the intro survey, interactive games, video scrolling/tutorials, a shop, and chat rooms! Through a deeper understanding of the user, surveys are a clever, quick, and useful tool to significantly improve both initial impressions and long-term success. Any program can benefit from video scrolling as it’s quick, entertaining, customizable, addictive, and simple to use. It makes use of the psychology of reward, validation, and curiosity. Learning is slipped into games so that it feels like play. They capture interest, foster emotional engagement, and establish a secure environment for trying, failing, and growing. They are therefore perfect for imparting knowledge to a younger audience, such as Gen Z. Earning points for discounts at popular stores and activities like going to the movies makes managing money feel enjoyable, practical, and gratifying. It’s a stepping stone to greater financial understanding. Instructing Generation Z on smart spending, strategic saving, and how to make money work for them. Financial literacy becomes a communal experience in chat rooms. They make learning safe, social, and encouraging. Gen Z is a perfect match for this since they favor community over solitude and collaboration over lectures.
User Flow and Storyboarding
A user flow illustrates the actions a user takes to finish a task on a website or in an application. It outlines every screen the user sees everything from beginning to end and demonstrates their movement through the experience. For example, the user path that I came up with went like this: Downloads app from YouTube ad, creates account via phone number, connects other social media accounts like TikTok, add friends/get acquainted with finance bot, take daily quiz and play other games to earn points, applies for credit card, and start/participating in discussion threads. Kyle was our decider for this exercise, the one who makes the final say for the user flow. The decider gets green circle/white star voting dots while the rest of the team gets blue ones. We ultimately went with Dylan’s user flow being the most fitting for the majority of Gen Z to follow!
Finally, storyboarding is the process of creating a step-by-step visual plan that outlines what your prototype will look like and how a user will interact with it. I made my own sample storyboard before my team meeting to get an idea of what exactly it’s supposed to be, using various sketches that we drew up from the previous exercise. It’s actually just piggybacking off of the user flow portion of phase 2 of the sprint! Since Dylan’s user flow was chosen, Chloe then modeled the new sketches for the storyboard off of that path! Users would start with the signup page, then the survey, followed by a consultation with a professional in finance to help set goals for themselves, and finally the home page, where the app shows their current goals, spending habits, and investments.
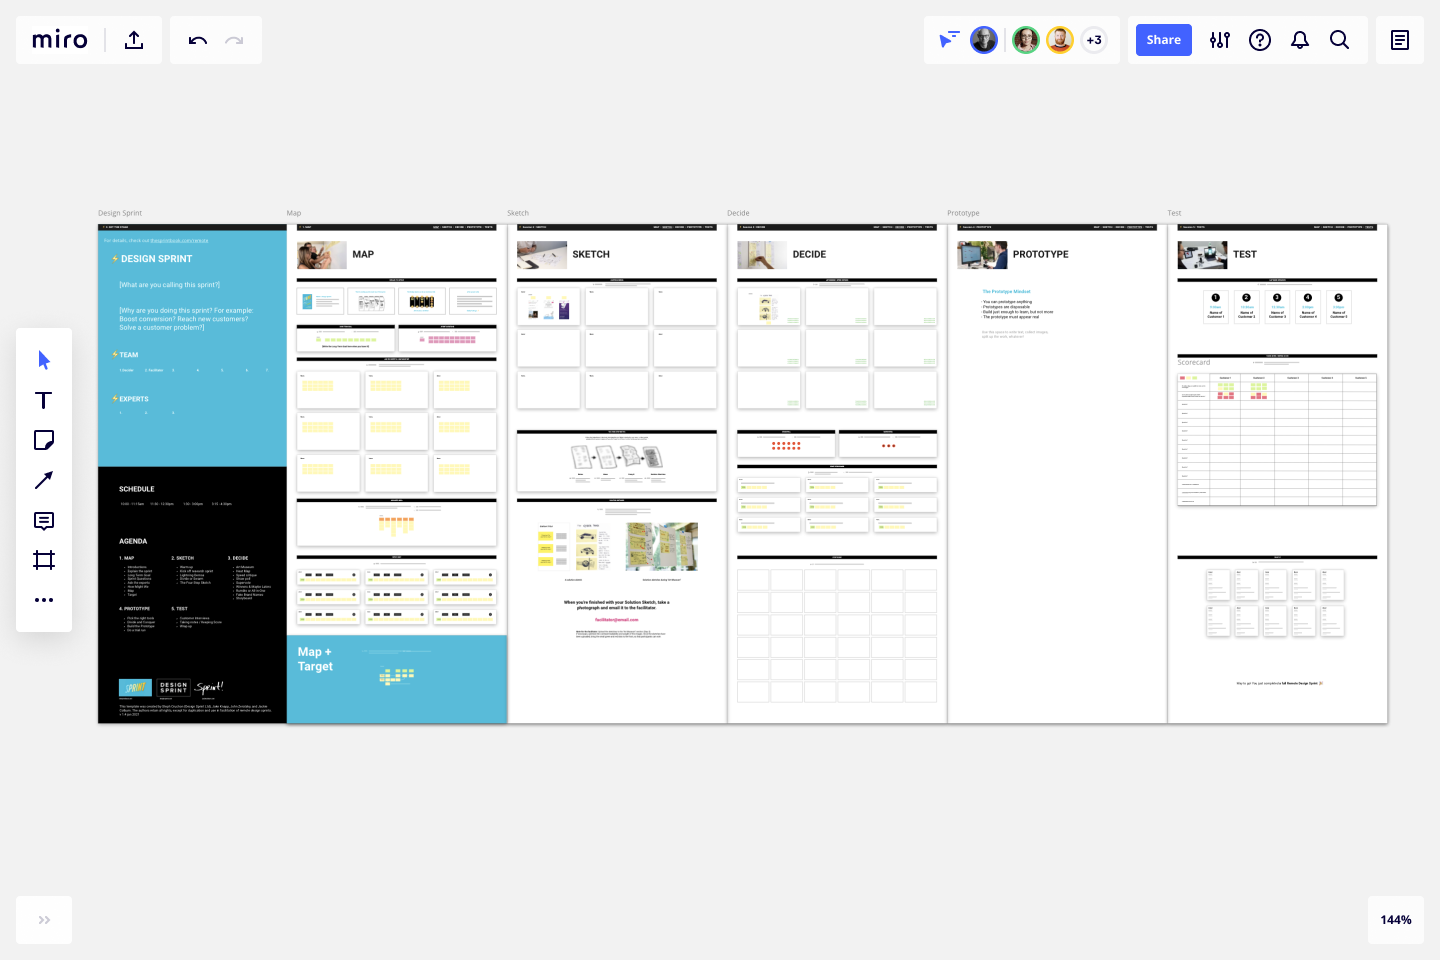
What a Miro board looks like on day 1 of a sprint.
The first day of a sprint is a crucial part of helping small startups and big companies create a successful prototype. It sets the tone and direction for the entire sprint. This blog post is a comprehensive breakdown of what typically happens! The purpose of the first day is to to define what will be delivered in the sprint and to plan how the work will be accomplished. It also serves to break down selected items into tasks and ensure everyone is aligned and ready to start building. The people involved are the product owner, who clarifies the priorities and goals, the facilitator, who facilitates the meeting and ensures the agreed principles are followed, and the development team, who commits to what they can deliver and plans the work. Finally, the development team break the goals down into smaller objectives and discuss how the work will get done and how long it will take.
The Product Brief Discussion
An example of what the starting objective and goal of the sprint could be is a finance management app. My group decided to create smartphone app dedicated to teaching our target demographic (Gen Z young adults) how to properly utilize their every penny. This can be long-term planning, saving, investing, and/or budgeting. Financial literacy is a skill that is desperately needed in schools for high schoolers and college students all across the country, so it makes for the perfect main goal for a sprint! We first brainstormed ideas on what the app could look like and the features it would hold. Users could get rewards from answering trivia questions correctly, they can view a “Categories” tab for financial guidelines and advice for all ages, and credit card applications/tips. You can even connect your account to TikTok, Instagram, etc., encouraging users to share their knowledge and spread awareness that financial help is always available.
A successful prototype is the main goal that’s determined on Day 1 of the sprint.
Lightning Demos and Sketch’s
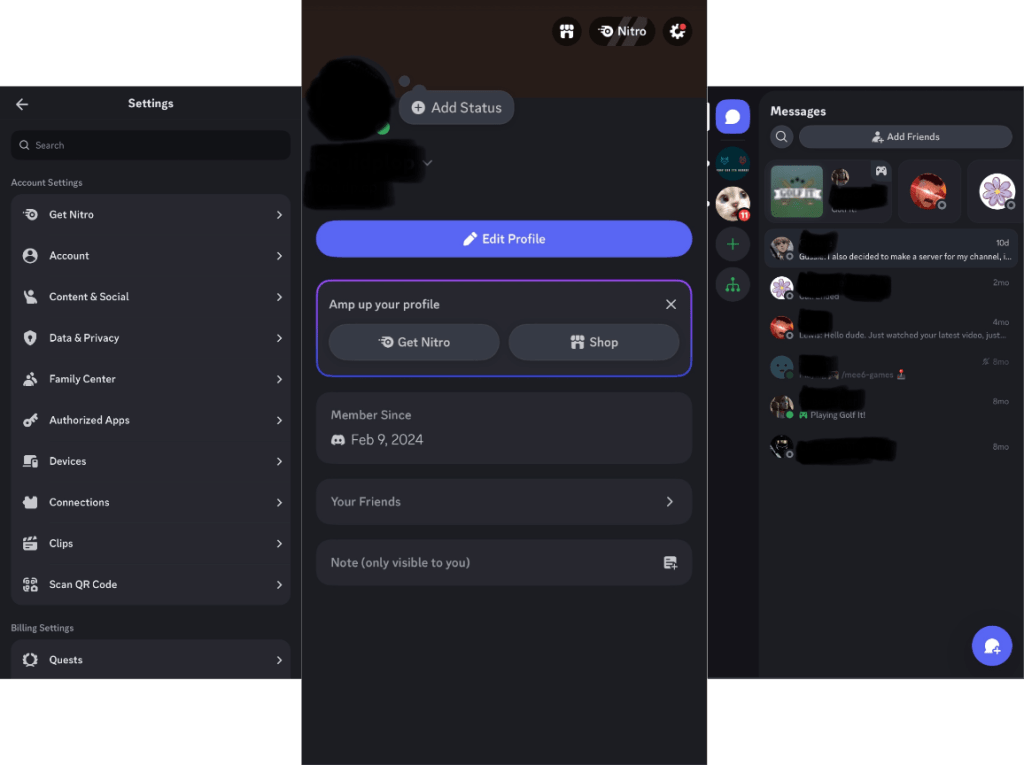
Lightning Demos are, essentially, quick ideas for how your prototype could potentially look. My group used this sprint technique excellently as we came up with plenty of bright designs and interfaces for our finance app. I personally saw fit to take inspiration from the look and style of Discord! I thought our app could use chat rooms, friend lists and requests, as well as dedicated 1-on-1 chat rooms with bots who are experts when it comes to money! It would be a smart and efficient way to connect with fellow users of the app and help each other learn better. Profile photos can also enhance the user experience and make their app feel closer to them.
Discord inspiration from left to right: Settings, profile, and chat rooms.
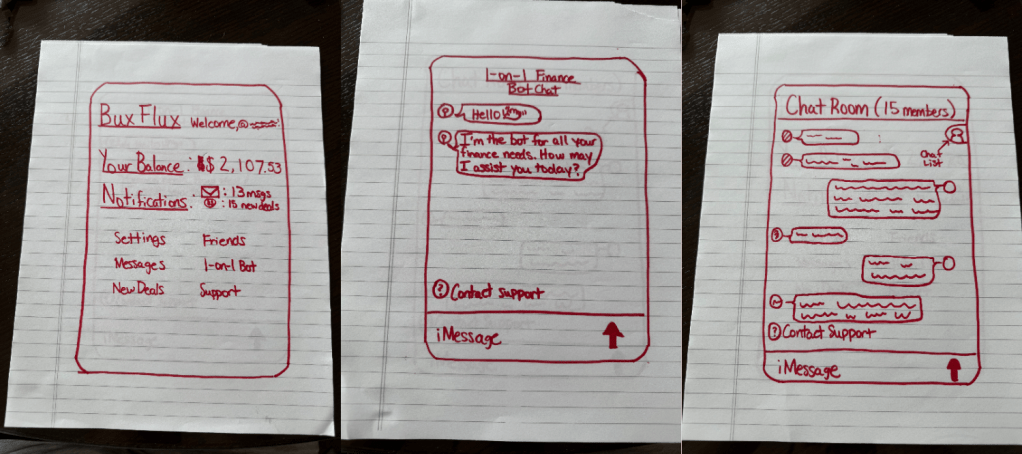
After gaining inspiration from Discord’s interface and aesthetic, it was time to start sketching and designing the potential look of our finance app! I started with a home page, with a sample site name and the username at the top of the page. Below that, the user can see their balance and notifications, as well as the settings, messages, friends, 1-on-1 bot, new deals and support pages. The next sketch is a sample of how talking to one of the bots would look like. It’s a standard chat room design, along with the next sketch, which is a chat room with a group of fellow users of our app. Both of them have an option to contact support and the chat room with friends gives you a list of the people in the chat at the top right of the page.
Discord sketches from left to right: Home page, 1-on-1 bot chat room, and friend chat room.
No, not THAT kind of sprint! It’s more like the one where you prepare to solve big problems and test new ideas in a little under a week! The Sprint process has been sharpened and refined for more than a decade, and with fresh new faces learning the ins-and-outs of the Design Sprint world, there’s no telling what other innovations and upgrades the current system will receive! But I’m getting ahead of myself! The sprint process, more specifically, the sprint checklist, has lots to comprehend and unpack, and is arguably the most important part. The effectiveness of a design sprint goes beyond excellent facilitation, an impressive prototype, and/or a carefully thought out user test. It’s the deciding factor that leads to the overall success of a design sprint, while also making each team member feel confident and organized during this herculean task.
Programs like Miro can make creating design sprint checklists fast and efficiently for all.
The Design Sprint Checklist and How it Works
A Design Sprint checklist is a structured guide used to plan and execute a Design Sprint effectively. It is a time-constrained, five-phase process (originally developed by Google Ventures) for answering critical business questions through design, prototyping, and testing ideas with users. It’s typically organized by preparation and daily activities, starting with the pre-sprint preparation, about 1-2 weeks before the actual sprint. It helps people feel confident and capable to complete the set goal, guarantees that you construct a validated prototype in 4-5 days, and minimizes the risk before investing in full development.
The group starts by defining the sprint challenge and/or problem, followed up by inviting the right team (a decision maker and facilitator for example) and scheduling the 4-5 day sprint. This is done through the use of block calendars, determining the tasks each team member is assigned and the timeframes to complete these tasks. The team can either choose to dedicate a room to the sprint or work remotely through programs like Zoom. Finally the group collects all the necessary tools and supplies for the sprint. After that, it’s time to get to work!
A real-life design sprint checklist in action.
Map, Sketch, Decide, Prototype, Test
Day 1 of the sprint starts with, essentially, mapping out the journey and defining a long term goal. The group must conduct expert interviews with each other and ask many “How Might We…?” sprint questions/notes. Moving on to Day 2, the team basically builds on the previous “Map” day. They craft solution sketches together and individually. The group then reviews and critiques said sketches along with utilizing holding Heat Map, Straw Pole, and Super votes. Everyone concludes with reviewing previous ideas and inspiration from Day 1. Day 3 begins with the prototype stage, dividing the roles amongst the group and conquering the task! Once the work has been completed, the group performs a test run and brainstorms questions for Day 4 User tests, where the sprint process finally wraps up!
It takes lots to cooperation, teamwork, and patience to successfully finish a Sprint.
I had no clue what to expect when I applied for the Interactive Media and Communications program at Quinnipiac University. All I knew is that the school’s website sold it well and caught my interest almost instantly. Working remotely and on computers is right up my alley and the course would only take a year to a year and a half to complete, so I figured I would give it a shot and apply. After months of anticipation and daydreaming, class officially started, and after a solid week into the course, I can confidently say that the exciting new world of Design Sprints has been an exciting, fun, breath of fresh air to my academic career! It also serves as quite the intriguing take on how I look at the day-to-day workflow process and how tasks in a company get completed!
What is the Sprint Process?
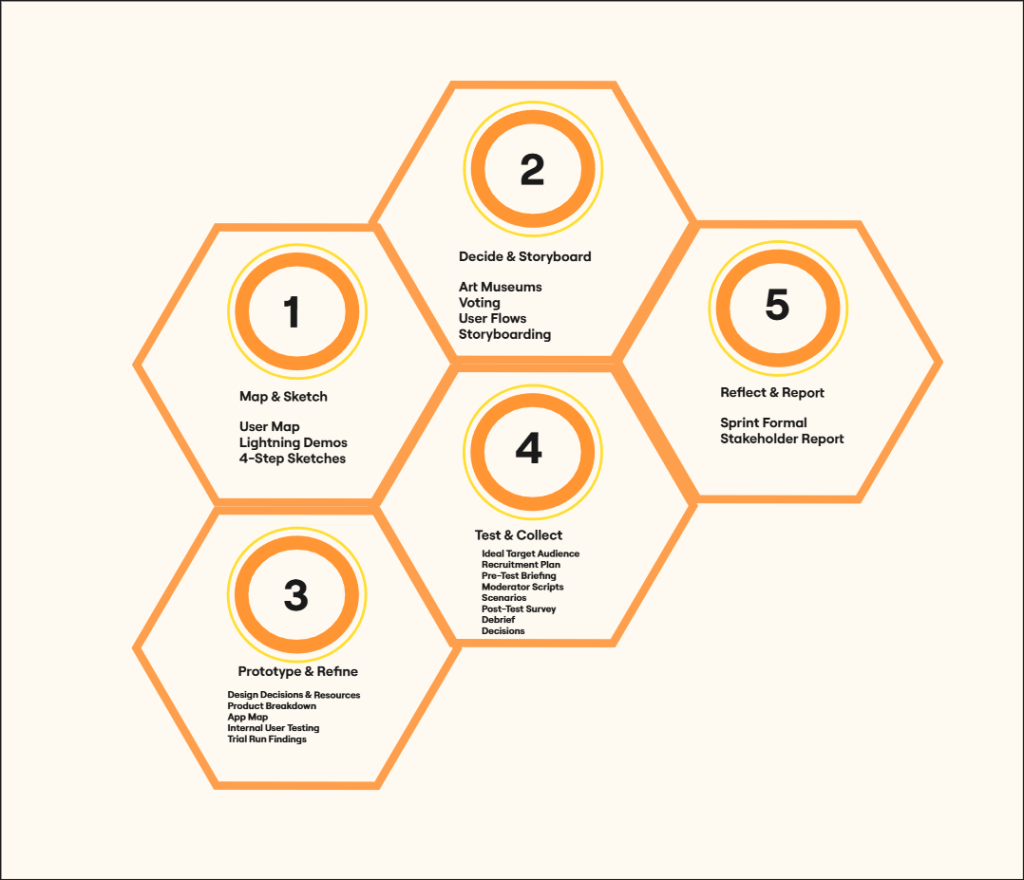
The sprint process as we know it was developed by Jake Knapp and John Zeratsky at Google Ventures in the early 2010’s. It was created to help startups and teams quickly solve critical problems in a compressed timeframe. I had always wondered how these big organizations and small startups alike get anything done, so it was highly interesting to delve deep into the origins of the sprint process! It’s broken down into 5 steps: Understand plus define, diverge plus decide, prototype, test, and reflect plus report. There are many foundational principles of Design Sprints to help keep the process smooth and functional for all team members involved. Two of them, for example, “Working together alone” emphasizes giving your teammates time and space to work by themselves while still contributing to the project as a whole. “Tangible Things Over Discussion” provides the value of crafting physical and/or visual representations of ideas, concepts, and prototypes, rather than relying solely on abstract discussions. It’s quite the incredibly deep and intricate system which I find ever more fascinating! This also holds true after learning about the basics of facilitation and the skills to use it properly!
Facilitation Basics and Skills
Facilitate, by definition, means to make (an action or process) easy or easier. After learning about facilitation in the context of design sprints during my second class meeting, I realized how effectively I’ve facilitated a variety of scenarios over the years! I led me fellow coworkers to help successfully build an inground pool many summers ago when working for a pool company, and I also ran a liquor store on my own for an entire shift! An excellent facilitator has a wide range of talents and characteristics that give them the capacity to lead and support group processes well. It takes practice and experience to design events that allow you to lead groups through creative and practical solutions.
One quality that makes a great facilitator is communication.A facilitator must possess exceptional verbal and nonverbal communication abilities. They should be able to listen intently, express themselves clearly, and encourage candid and civil discussion among group members. Another essential quality of a stellar facilitator is being an active listener. An excellent facilitator actively hears what participants have to say in order to comprehend their viewpoints, wants, and worries. They establish a welcoming and secure atmosphere where everyone is respected and feels heard. One more quality that makes up a top notch facilitator is empathy. A superb facilitator is able to comprehend and empathize with the participants’ feelings and experiences. They foster a supportive environment, handle conflict in a constructive manner, and are perceptive of both individual and group dynamics. This last one, I feel, is the most important, since it’s a quality that a lot of people lack, especially in the workforce.
What’s Next?
I become more and more curious to learn about this exiting new world of Design Sprints by the day! From it’s inception back in the early 2010’s, to the various methods and qualities that it takes to make a Sprint run smoothly and effectively, I only grow more eager to soak in further knowledge in this field! I can’t wait to jump into learning about how startups prepare for said sprints and report back when I’ve mastered more!